一、链表定义
链表在 redis 中的使用十分广泛,例如列表的底层实现之一就是链表,包括发布、订阅等等功能都是有用到链表的。 redis 中链表在 adlist.h 和 adlist.c 中实现,只用了 300+行代码,十分简单。
redis 中的链表是一个双向不循环的链表,两个核心的数据结构是 listNode 和 list,其中 listNode 的定义如下:
|
1 2 3 4 5 |
typedef struct listNode { struct listNode *prev; struct listNode *next; void *value; } listNode; |
listNode 是链表节点定义,链表节点和平常用到差别不大,由一个数据域和两个分别指向前后节点的指针组成。
list 的定义为:
|
1 2 3 4 5 6 7 8 |
typedef struct list { listNode *head; listNode *tail; void *(*dup)(void *ptr); void (*free)(void *ptr); int (*match)(void *ptr, void *key); unsigned int len; } list; |
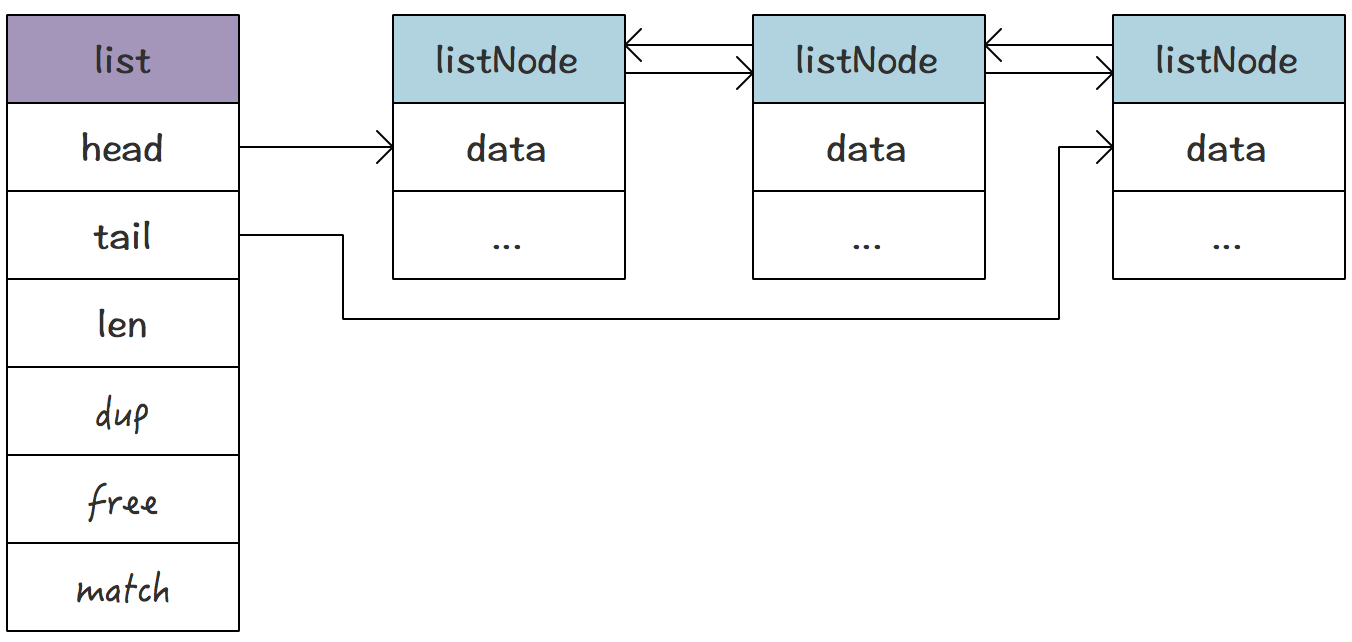
它和普通链表定义的不同点在于:除了包含首尾指针以及链表长度以外,链表的结构还包含了 3 个函数指针结构:
dup: 用于拷贝节点的函数。free: 用于释放节点的函数。match: 用于对比节点是否相等的函数。
链表的宏观结构:
二、链表操作
2.1 链表创建和释放
初始化的过程主要是创建链表对象,并初始化值:
|
1 2 3 4 5 6 7 8 9 10 11 12 13 14 15 16 |
list *listCreate(void) { struct list *list; // 分配内存空间 if ((list = zmalloc(sizeof(*list))) == NULL) return NULL; // 初始化成员 list->head = list->tail = NULL; list->len = 0; list->dup = NULL; list->free = NULL; list->match = NULL; return list; } |
释放链表:
|
1 2 3 4 5 6 7 8 9 10 11 12 13 14 15 16 17 18 19 20 21 |
void listRelease(list *list) { unsigned int len; listNode *current, *next; current = list->head; len = list->len; // 循环遍历链表 while(len--) { next = current->next; // 如果有自定义的 free 函数,先调用函数释放节点内部数据 if (list->free) list->free(current->value); // 释放节点 zfree(current); current = next; } // 释放链表 zfree(list); } |
2.2 插入节点
插入节点提供了三个函数,分别是从头部插入、从尾部插入以及从指定位置插入。
头插法:
|
1 2 3 4 5 6 7 8 9 10 11 12 13 14 15 16 17 18 19 20 21 22 23 24 25 26 27 |
list *listAddNodeHead(list *list, void *value) { listNode *node; // 给新插入的节点分贝内存空间并赋值 if ((node = zmalloc(sizeof(*node))) == NULL) return NULL; node->value = value; // 插入节点 if (list->len == 0) { // 链表为空的时候要给首尾指针赋值 list->head = list->tail = node; node->prev = node->next = NULL; } else { // 插入节点到链表 node->prev = NULL; node->next = list->head; list->head->prev = node; list->head = node; } // 长度加 1 list->len++; return list; } |
尾插法,和头插法基本一致:
|
1 2 3 4 5 6 7 8 9 10 11 12 13 14 15 16 17 18 19 |
ist *listAddNodeTail(list *list, void *value) { listNode *node; if ((node = zmalloc(sizeof(*node))) == NULL) return NULL; node->value = value; if (list->len == 0) { list->head = list->tail = node; node->prev = node->next = NULL; } else { node->prev = list->tail; node->next = NULL; list->tail->next = node; list->tail = node; } list->len++; return list; } |
插入节点到指定位置:
|
1 2 3 4 5 6 7 8 9 10 11 12 13 14 15 16 17 18 19 20 21 22 23 24 25 26 27 28 29 30 31 32 33 34 35 36 37 38 39 40 41 42 43 44 45 46 |
/* * 参数说明 * @list 链表对象 * @old_node 被插入的节点 * @value 新插入节点的数据域 * @after 是查到节点的后面还是前面 * @return 插入成功后返回传入的链表对象,否则返回 NULL */ list *listInsertNode(list *list, listNode *old_node, void *value, int after) { listNode *node; // 创建新节点并赋值 if ((node = zmalloc(sizeof(*node))) == NULL) return NULL; node->value = value; // 插入节点 if (after) { // 插入到 old_node 节点后 node->prev = old_node; node->next = old_node->next; if (list->tail == old_node) { list->tail = node; } } else { // 插入到 old_节点前 node->next = old_node; node->prev = old_node->prev; if (list->head == old_node) { list->head = node; } } // 修改前一个节点的 next 指向 if (node->prev != NULL) { node->prev->next = node; } // 修改后一个节点的 prev 指向 if (node->next != NULL) { node->next->prev = node; } // 链表长度加 1 list->len++; return list; } |
2.3 删除节点
|
1 2 3 4 5 6 7 8 9 10 11 12 13 14 15 16 |
void listDelNode(list *list, listNode *node) { if (node->prev) // 删除的不是头结点,修改前一个节点的 next 指针 node->prev->next = node->next; else // 删除的是头结点,更新 head 指向 list->head = node->next; if (node->next) node->next->prev = node->prev; else // 删除的是尾结点,更新 next 指向 list->tail = node->prev; // 存在节点的 free 函数,调用函数释放节点内部资源 if (list->free) list->free(node->value); zfree(node); list->len--; } |
三、链表遍历
redis 在实现链表的时候,给链表的遍历单独创建了一套结构和方法。其中遍历的结构是 listIter,它包含了一个 listNode *的指针域和遍历方向 direction:
|
1 2 3 4 |
typedef struct listIter { listNode *next; int direction; } listIter; |
direction 的作用是标记遍历方向是从头部往尾部遍历还是从尾部往头部遍历,获取一个 listIter 的方法:
|
1 2 3 4 5 6 7 8 9 10 11 12 13 14 |
listIter *listGetIterator(list *list, int direction) { listIter *iter; if ((iter = zmalloc(sizeof(*iter))) == NULL) return NULL; if (direction == AL_START_HEAD) iter->next = list->head; // 从头往尾遍历,iter 指向头结点 else iter->next = list->tail; // 从尾往头遍历,iter 指向尾结点 iter->direction = direction; return iter; } |
配合 listNode 获取下一个节点的函数:
|
1 2 3 4 5 6 7 8 9 10 11 12 13 14 |
listNode *listNext(listIter *iter) { // 保存当前指针 listNode *current = iter->next; // if (current != NULL) { if (iter->direction == AL_START_HEAD) iter->next = current->next; // 赋值下一个节点到 iter else iter->next = current->prev; // 赋值前一个节点到 iter } return current; } |
注意 listNext 函数只是获取当前 iter 指向的节点,并把 iter 指向下一个节点。为什么要把遍历操作单独抽离出来呢?
主要有以下几个目的:
- 外部遍历时不用重复编写遍历代码。前面已经说过,链表在 redis 很多场景都用到了,所有的结构共用一套遍历实现就可以了。
- 外部遍历的时候无需访问 list 的内部元素,充分做到了面向对象的理念。
四、其他
4.1 链表拷贝
|
1 2 3 4 5 6 7 8 9 10 11 12 13 14 15 16 17 18 19 20 21 22 23 24 25 26 27 28 29 30 31 32 33 34 35 36 37 38 39 40 |
list *listDup(list *orig) { list *copy; listIter *iter; listNode *node; // 为新链表创建内存空间 if ((copy = listCreate()) == NULL) return NULL; // 初始化 copy->dup = orig->dup; copy->free = orig->free; copy->match = orig->match; // 遍历 iter = listGetIterator(orig, AL_START_HEAD); while((node = listNext(iter)) != NULL) { void *value; if (copy->dup) { // 如果存在复制函数,使用自定的复制函数来复制每个节点 value = copy->dup(node->value); if (value == NULL) { // 复制失败,释放掉前面已经拷贝成功的节点,避免内存泄漏 listRelease(copy); listReleaseIterator(iter); return NULL; } } else value = node->value; // 新拷贝的节点插入到链表结尾 if (listAddNodeTail(copy, value) == NULL) { listRelease(copy); listReleaseIterator(iter); return NULL; } } listReleaseIterator(iter); return copy; } |
4.2 链表查找
|
1 2 3 4 5 6 7 8 9 10 11 12 13 14 15 16 17 18 19 20 21 22 23 24 25 |
listNode *listSearchKey(list *list, void *key) { listIter *iter; listNode *node; // 遍历链表 iter = listGetIterator(list, AL_START_HEAD); while((node = listNext(iter)) != NULL) { if (list->match) { // 使用自定义的比较函数来比较每个节点和查找的 key if (list->match(node->value, key)) { listReleaseIterator(iter); return node; } } else { // 使用默认的比较函数来比较节点和 key if (key == node->value) { listReleaseIterator(iter); return node; } } } listReleaseIterator(iter); return NULL; } |
4.3 返回指定位置上的元素
传入索引,返回对应位置上的元素,支持从尾部索引:
|
1 2 3 4 5 6 7 8 9 10 11 12 13 14 15 |
listNode *listIndex(list *list, int index) { listNode *n; if (index < 0) { // index 小于 0,从尾部开始索引 index = (-index)-1; n = list->tail; while(index-- && n) n = n->prev; } else { // index 大于 0,从头部开始索引 n = list->head; while(index-- && n) n = n->next; } return n; } |
五、总结
收获很大,主要是两个地方感触很深:
- 链表的遍历
- 从尾部开始返回对应索引位置上面的元素
其实实现并不算难,只是实现的思路和想法很新颖,很值得学习!